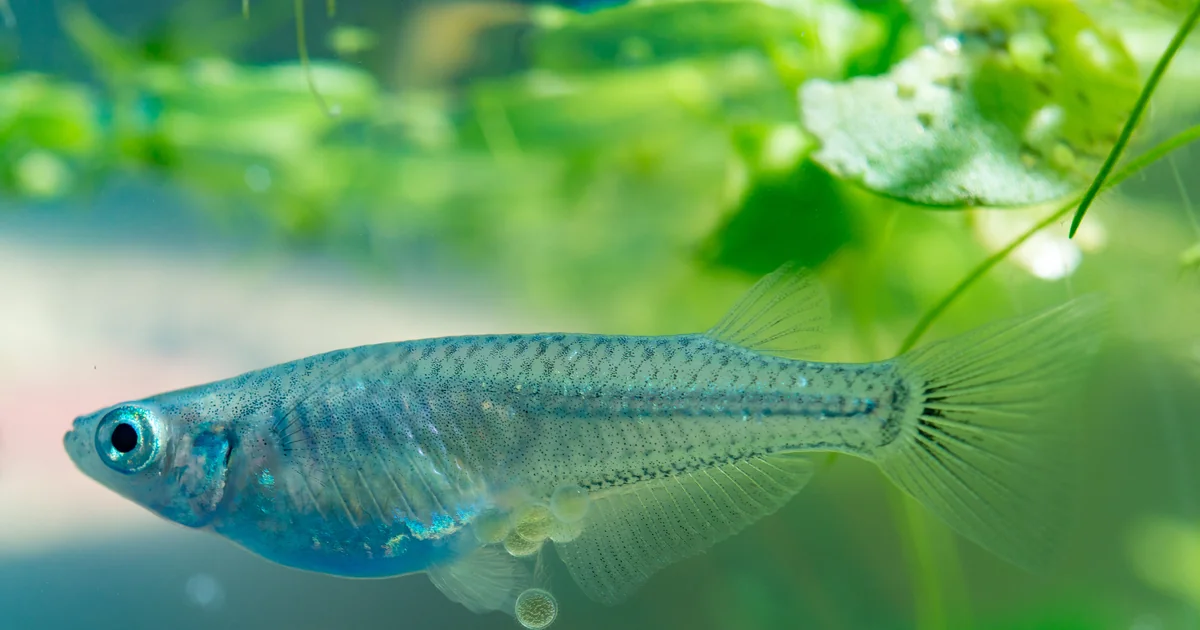
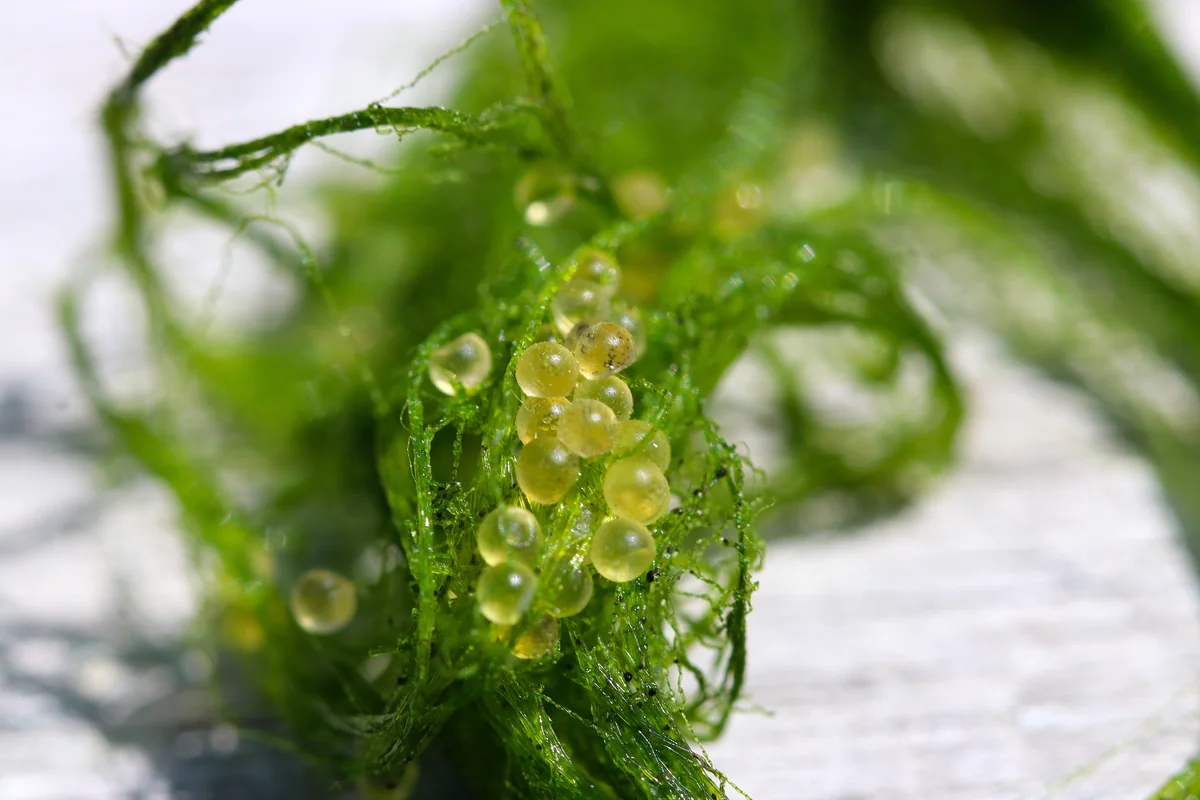
You’re doing your morning check on the medaka tub and you notice something strange hanging off one of the females. A tiny grape-like cluster of translucent spheres, dangling from her vent as she swims. Your first thought is probably “is she sick?”, but she’s not. Those are eggs, and you’ve just watched the most distinctive thing medaka do. That cluster will stay attached to her for hours before she deposits it on a clump of Java moss or a spawning mop. And if you don’t have a plan for what happens next, most of those eggs will be gone by tomorrow morning.
Here’s the short answer: medaka eggs are sticky, robust, and easy to collect, but the fry that hatch from them are not. The breeding itself is forgiving. The three-week window after hatch, called the hariko (針子) stage, is where most first-time breeders lose their whole clutch. This guide walks you through all five stages: spawning, egg collection, incubation, hariko, and growing out to juveniles. If you’re new to medaka in general, start with our Japanese rice fish care guide first to get the baseline setup right, then come back here when you see your first egg cluster.
Disclosure: This post contains affiliate links. If you purchase through a link on this page, we may earn a small commission at no extra cost to you. We only recommend products we’d use in our own tanks.
What Medaka Eggs Look Like (And the Pendant Egg Behavior)
Medaka eggs are small, roughly 1 mm, and transparent, with visible oil droplets inside. They’re adhesive, held together in a cluster by fine filaments that keep them stuck to each other and to whatever the female eventually deposits them on. At first glance the cluster hanging off a female’s vent looks almost like a parasitic attachment. It isn’t. This is completely normal spawning behavior for the species.
What makes medaka different from most aquarium egg-layers is exactly this: the female doesn’t scatter eggs randomly into the water. She carries the adhesive cluster for hours, swimming around until she finds a suitable surface, Java moss, a spawning mop, fine-leaved plants, and deposits it there. That “pendant egg” behavior is why medaka eggs are so easy to collect compared to, say, neon tetra eggs, which scatter and sink and are nearly impossible to gather without a spawning grate.
On day one, you can already distinguish fertile eggs from infertile ones. Fertile eggs are clear and translucent. Infertile or dead eggs turn opaque white within 24 hours. If you see a whole cluster go white on day one, that’s usually a sign there’s no active male in the tank, or that the male is too young to fertilize effectively, not that the eggs themselves are defective. More on that in the troubleshooting section.
Medaka Spawning Behavior, When They Lay Eggs
The two non-negotiable spawning triggers for medaka are water temperature at or above 18–20°C (65–68°F) and a photoperiod of at least 12–13 hours of light per day. Photoperiod is actually the stronger cue. A tank that warms up but stays under 12 hours of daily light often won’t spawn, even in summer.
Once both conditions are met and the fish are well-conditioned on a varied diet with live or frozen foods, females typically spawn daily. In temperate climates, this runs roughly April through October. High-protein conditioning, live daphnia, mosquito larvae, brine shrimp, accelerates spawning readiness and increases egg counts. A well-conditioned female can produce 10–30 eggs per spawn, and up to 50 in peak condition.
For indoor tanks, this is easy to control with a timer. For outdoor tub keepers, the seasonal rhythm handles itself. Courtship actually begins before sunrise, with spawning activity peaking between 08:00 and 11:00 in the morning, so if you’re checking for eggs, that’s your window. If you keep an outdoor medaka biotope, the spring-to-autumn spawning season aligns naturally with the lengthening photoperiod, and you may start seeing egg clusters on your tub vegetation as early as April without doing anything special.
One useful breeding detail that most guides skip: male medaka mate roughly 19 times per day on average. The first mating of the day releases the highest sperm count, with near-100% fertilization of the female’s eggs. By the final matings of the day, sperm output drops to less than 1% of the morning’s count. In practice, this means if you’re running a dedicated breeding setup and want maximum fertilization, collecting eggs in the morning gives you the best results.
Egg Collection, Spawning Mops vs Java Moss
This is the question every new medaka breeder argues about, and the honest answer is: it depends on what you’re optimizing for. Both work. Neither is clearly better in all situations.
Spawning Mops
Spawning mops are yarn-bundled clumps suspended in the tank or floating at the surface. Medaka readily deposit their adhesive clusters on the yarn fibers. The big advantage is removal: you can lift the whole mop out, transfer it to a 5–10 gallon egg-rearing container, and add a fresh mop in its place. Eggs are visible against the yarn, so you can count and inspect them easily. Dark-colored yarn makes the translucent eggs easier to spot.
The downside is labor. If your females are spawning daily during peak season, you’re pulling mops every morning. That’s fine if you’re running a dedicated breeding operation. It’s annoying if you just want a self-sustaining tub with occasional juvenile production.
A practical note on mop construction: yarn is the traditional material, but the DIY hobby world has been using cut-up pool noodles paired with sponge pieces with great results. A friend made me a few for my outdoor medaka tubs, and the females latch onto them just as reliably as yarn. The noodle gives positive buoyancy without needing a float; the sponge in the middle holds the eggs and gives fry hatching in-tank a refuge to hide in. Cheaper than commercial mops and easier to rinse between cycles.
Java Moss
Java moss is more natural and requires no intervention. Females deposit eggs among the fine fronds, and newly hatched fry find immediate refuge and microfauna among the moss strands. For outdoor biotope tubs, Java moss is often the better choice, you don’t need to manage it daily, and the moss itself develops a biofilm that newly hatched fry can graze.
However, Java moss allows adults to access the eggs more easily than a removed mop does. Egg recovery is lower than with spawning mops or grates. If adults are eating eggs before they hatch, moss alone won’t protect them. You’ll also find it harder to monitor egg development, the fronds make inspection difficult.
The Hybrid Approach
Most experienced medaka breeders run both. Spawning mops for active egg collection and controlled incubation; Java moss as a backup substrate where some eggs develop naturally and fry that hatch in-tank have cover. If you’re keeping an outdoor tub and just want juveniles to appear each season, Java moss plus hornwort plus whatever naturally floats on the surface is enough. If you want to maximize yield and raise specific color varieties, pull mops daily and incubate separately.
Medaka Egg Incubation, From Lay to Hatch
Medaka eggs hatch in 8–10 days at 24–28°C (75–82°F). At cooler temperatures, around 18°C (65°F), hatch time extends to 14–16 days. This is important for outdoor tub keepers in spring: eggs laid in early April may take two full weeks to hatch because nighttime temperatures pull the average down. My own outdoor tubs here in Hawaii consistently hatch in the 1 to 2 week window depending on the recent temperature swing, which is right in the middle of the temperature-band guidance. For more on the outdoor-tub setup itself, our medaka pond guide covers the container and planting decisions that affect water temperature stability.
For controlled incubation, set up a small bare-bottom container, a 5–10 gallon tank or a food-safe plastic tub both work. Add gentle aeration with a sponge filter; the water movement mimics the fanning currents that parents would provide and helps prevent stagnant pockets around the eggs. Do not use a filter with an open intake, fry will be sucked in within hours of hatching.
Methylene blue is the traditional egg antifungal, used at a very pale dose in the incubation container. It helps protect viable eggs when dead eggs in the cluster start to fungus. That said, methylene blue kills beneficial bacteria, so use it only in the egg-rearing container, not in a cycled tank. Modern egg-safe antifungal formulations are available and safer for established setups.
More important than any chemical treatment is removing dead eggs promptly. Dead eggs turn opaque white. A turkey baster or fine-tip pipette is the right tool, fungus spreads from dead eggs to adjacent live ones quickly, and removing the source is more effective than treating the whole container. Inspect daily and extract anything that has gone white. Around day 4 or 5, look for the eye spot developing inside the egg, a visible dark dot that confirms the embryo is viable and developing normally.
Hariko (針子), The Critical First Weeks After Hatch
Medaka hatchlings, called hariko (針子, meaning “needle fry”) in Japanese, emerge at about 4–5 mm. At that size, their mouths are too small for baby brine shrimp nauplii. This is the most important thing to understand about medaka fry, and it’s where most first-time breeders lose an entire cohort. The hariko stage lasts roughly two to three weeks and has the highest mortality of any phase.
For the first two or three days after hatch, hariko consume their yolk sac. Don’t feed during this window, and don’t disturb the tank. On day three, the yolk depletes and the fry must begin eating exogenous food. If there’s nothing appropriately sized in the water, they starve. They will look active and healthy right up until they die, starvation in tiny fry isn’t obvious until it’s too late.
The right first food is paramecium or infusoria, single-celled microorganisms small enough for a sub-5 mm fish to consume. Hikari Medaka-No-Mai Baby fry food is a dedicated powdered product formulated for this stage and is widely used by Japanese breeders. Without infusoria or an equivalent first food, even well-intentioned fry die in three to five days. Establish your infusoria or paramecium starter culture at least a week before you expect eggs to hatch. A commercial paramecium starter culture takes time to establish, and if you’re waiting until hatch day to start one, you’re already behind.
From days 7–10, you can begin introducing vinegar eels. At 50–75 µm in diameter, vinegar eels are substantially smaller than microworms and ideal for fish with mouths under 0.3 mm. Medaka hariko transition well onto vinegar eels as a bridge food before they’re large enough for microworms or baby brine shrimp. For more detail on culturing live foods for fry, see our guide to hatching baby brine shrimp and culturing live foods.
Survival of 70% or better through the hariko stage is achievable with proper food availability. Without the right food at the right time, expect much worse. The hariko window is unforgiving in a way that adult medaka care simply isn’t.
Wakaba (若葉) and Beyond, Growing Juveniles to Adults
Once hariko reach 5–10 mm, they enter the wakaba (若葉, “young leaf”) stage. At this size, baby brine shrimp nauplii become an appropriate food. Brine shrimp nauplii are nutritious, easy to hatch on demand from dried cysts, and trigger a strong feeding response in medaka. A cone hatchery with a separate brine shrimp egg supply makes daily or every-other-day hatching practical. Rinse nauplii through a fine mesh net before feeding to remove saltwater, dumping saline water into a freshwater fry tank causes stress.
As fry grow through 10–15 mm, you can begin supplementing or transitioning to a powdered dry food. Hikari Medaka-No-Mai Baby is the standard here, it’s sized appropriately for juveniles and formulated specifically for medaka. Gradually shift the food balance toward dry food as fry grow, reducing the frequency of live-food feedings.
At the 15–25 mm sei-gyo (成魚) sub-adult stage, fry are on standard medaka diet and no longer need specialized first foods. However, size sorting matters at this stage. Larger juveniles will outcompete and sometimes predate on significantly smaller ones. If you have a wide size range in your grow-out container, which happens when females spawn over multiple weeks, sort by size to prevent losses and uneven growth.
Medaka reach sexual maturity at around three to four months. Adults measure 25–40 mm. Once juveniles are large enough that adults won’t eat them, typically around 15 mm, you can introduce them to the main tank or outdoor tub. A productive female generates roughly 500–2000 juveniles across a full season under good conditions.
Common Medaka Egg and Fry Problems
Most medaka breeding problems fall into a short list of predictable failures. If you know what to look for, diagnosis is usually fast.
All Eggs Turning White
If 100% of your eggs go white within 24 hours, the most likely cause is that there’s no functional male in the tank. This happens more often than you’d expect, because two females will sometimes coexist peacefully and even go through pseudo-spawning motions without any fertilization occurring. Verify your pair by behavior, males display and pursue, females respond or flee, and by external markings if your variety is visually dimorphic.
A second possibility is an immature male who isn’t yet producing viable sperm. Condition the group on a high-protein live food diet for two to three weeks and try again. If water quality is poor, elevated ammonia, nitrite, or nitrate, fertilization rates drop even with a healthy pair. Test parameters before blaming the fish.
Eggs Fungusing Despite Treatment
Methylene blue prevents fungus from spreading, but it doesn’t cure an egg that’s already dead. If fungus keeps appearing despite treatment, prioritize physical removal of white eggs over chemical treatment. A turkey baster or fine pipette lets you extract dead eggs without disturbing viable ones. Add a gentle airstone near the egg cluster to improve water circulation. Stagnant pockets around eggs allow fungal spores to accumulate.
Hariko Fry Disappearing in Week One
If fry appear to hatch normally and then vanish or die within the first week, starvation is almost always the cause. The hariko stage requires paramecium or infusoria from day three. If your infusoria culture wasn’t established before hatch, the fry had nothing to eat during their critical first-feeding window. Restart with cultures established at least a week in advance of the next spawn.
Fry Disappearing Into the Filter
A 4–5 mm hariko fry is easily sucked into any filter intake without a pre-filter sponge. A sponge filter is the standard choice for fry tanks because it provides biological filtration with no suction risk. If you’re using a hang-on-back or canister filter, cover the intake with a sponge pre-filter. This is not optional, fry will be gone within hours if the intake is open.
Adults Eating Eggs
Medaka will eat their own eggs. This isn’t unusual behavior, it’s the norm for egg-scattering fish that don’t provide parental care. The solution is physical separation: remove the spawning mop or Java moss clump with the eggs on it and transfer it to the incubation container. If you’re relying on in-tank vegetation and seeing low survival, the adults are likely eating eggs before they hatch. Switch to removable spawning mops for better egg recovery.
FAQ
How long do medaka eggs take to hatch?
At 24–28°C (75–82°F), medaka eggs typically hatch in 8–10 days. At cooler temperatures around 18°C (65°F), hatch time extends to 14–16 days. Outdoor tub keepers in spring should expect the longer end of that range until water temperatures stabilize.
Do I need to remove medaka eggs from the parent tank?
You don’t have to, but survival is much higher if you do. Adults will eat eggs and newly hatched fry. For maximum yield, transfer spawning mops or egg-bearing Java moss to a separate incubation container after spawning. For outdoor tubs where you just want some natural recruitment each season, leaving eggs in densely planted vegetation gives fry a chance without daily intervention.
What do baby medaka eat for the first week?
For the first two to three days, hariko fry consume their yolk sac and need nothing from you. Starting on day three, they need paramecium or infusoria, microscopic organisms small enough for a 4–5 mm fish. Hikari Medaka-No-Mai Baby powdered fry food is a commercial option formulated for this stage. Baby brine shrimp are too large for first-feeding hariko. You can introduce vinegar eels around day 7–10 as a bridge food before transitioning to baby brine shrimp at the wakaba stage.
Can I leave medaka eggs in an outdoor tub?
Yes. Outdoor tubs with dense vegetation, Java moss, hornwort, water sprite, allow some eggs and fry to develop naturally without intervention. Survival won’t be as high as controlled incubation, but you’ll still get juvenile recruitment each season. The adults eat some eggs and fry, the plants provide cover for others. Many outdoor medaka keepers prefer this hands-off approach and supplement it by occasionally pulling a mop for dedicated incubation when they want more juveniles.
How many eggs does a medaka lay per day?
A typical medaka female produces 10–30 eggs per spawn, with well-conditioned females occasionally reaching up to 50. During peak breeding season from roughly April through October in temperate climates, females spawn daily when temperature and photoperiod conditions are met. A single productive female can generate 500–2000 juveniles across a full season under good care.
Final Thoughts
Medaka spawning is about as low-effort as fish breeding gets. The pendant egg behavior means you can see exactly when a female has laid, collect the cluster easily from a spawning mop, and transfer it to an incubation container without much fuss. Eggs are adhesive and relatively robust. Incubation is forgiving within the temperature range.
The hariko stage is different. Those first two weeks after hatch are genuinely unforgiving if you don’t have the right food ready. Establish your paramecium or infusoria starter culture at least a week before eggs are due to hatch. Have Hikari Medaka-No-Mai Baby on hand as a backup or primary option. Don’t count on baby brine shrimp alone in week one, the fry simply can’t eat them yet. Get the first-food window right, and the rest of the grow-out is straightforward.
For the full species picture, care parameters, color varieties, outdoor tub setup, and the broader medaka trend, the medaka species guide covers the rest. And if you’re running an outdoor biotope and want to understand the seasonal rhythm in more detail, see the outdoor medaka biotope guide for tub depth, winter management, and mosquito control. A well-managed tub with a productive female or two can realistically yield hundreds of juveniles per season without intensive daily management. You just need to get them through the needle stage first.